Step 4 - Animating Your Button!There are pretty much 4 basic moves in button animating, the slide in/out, and the fade in/out. It doesnt sound like much but these 4 simple animating techniques can do so much. I even got some examples for ya below.


We'll start off with the fading in, and fading out. Now there is two ways to do this. You can do it the hard, time consuming, choppy, ugly way, or the easy clean fun hands free no work way. The first way it to take the image/text you want to fade, and create, oh, say about ten duplicate frames. Then frame by frame change the opacity by 10% each time, this is how I used to do it until I found a much, much better way. There is an addon command which you can get for fireworks, called animate opacity, you can pick it up at
Project
Fireworks, or download it
here. Just place everything in the zip file into your commands folder in fireworks. I'm not going to go in depth on how to do the fade the first way, but I will teach you how to use the command. First what we need to do is create some text, you need a good font that will look good when in the lower sized fonts. (they have some great ones at
Cuba Dust). Now create the text you would like to fade in. Do this by selecting the text tool in the tool bar (The big A). Then click somehwere in your image, a new window pops up, check the image below to see what everything means.
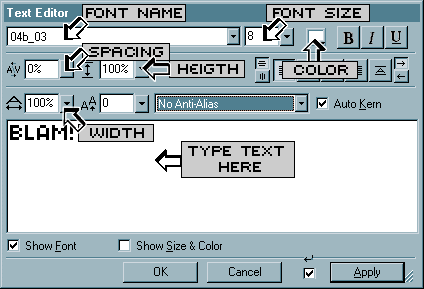
When your finished with setting the font size/color and the text push ok. Then adjust the text where you want it on the image, and give it a black border. Next, go to commands and select animateopacity (See above if you do not have). A prompt window will come up asking how many frames you want it to be, the more frames the smoother it will be, but the bigger the file will be. Between 5-10 frames usually works for me. Set how many frames you want and push OK. Another screen will pop up asking the start opacty. To fade in set the opacity to 0, to fade out set the opacity to 100, then push OK. Another screen comes up asking the end opacity. To fade in put 100, to fade out put 0. It will then create the necessary frames for you. BUT, you are not done your fade yet. Open up the frames docker (window > frames) And you will see a list of frames, select #2 and you will see that there is no background. Dont panic, you will need to put the background onto ever frame after fram #1. AAAAH!! Dont panic, theres an easy way to do it. 1. Go to the first fram, Select the background and push Ctrl+C to copy it. 2. Goto the second frame, Push Ctrl+V to paste. Once you do that then your background will appear on that frame. 3. Now you need to send it to the back. Do that by pushing the combination of Ctrl+Shift+Down. Repeat steps 2 and 3 to all of your frames. You will then have successfully done a fade!
NOTE: Fades can be used on any images/text that you wish to do them on, but over using fades can cause your images size to get very large, so be aware when creating buttons with fades.Now we have slides, slides are rather easy to creat and don't take much work. First you need to select the text/image that you would like to slide, and in frame one, set it so the side so you all you can see is the blue outline. Then open up the frames docker and in it select the first frame, once you have doen that drag the first frame on to the new frame icon (

). This will create a duplicate frame. On frame #2 select the image you want to slide and move them about 15 pixels towards the image. (The more pixels you move it the faster the slide will be). Continue duplicating frames and moving the image until the object is in desired position. And that is all for the slide.
Step 5 - Making It All Make SenseThere are two crucial elements of making a button, first the graphics and colors must fit and look good, and second, the animation must be thorough, clean, and put together well. When creating a button it is also important to make it short, to both be a smaller file, and so the people viewing it don't lose interest. When finalizing the animation be sure you dont have a fade in, then at the end just cut to the first frame, you need to make it look that there is no begining to it, and no end so it flows and doesn't look choppy. Well thats about it, I never knew it took so much effort to create such a small button until I wrote this. Hope this helps everyone and if not, there's always the graphics forum.